If you grew up in the early 90s, chances are you have fond memories of playing games on the Super Nintendo Entertainment System (SNES), the 16-bit console that revolutionized the video game industry with its advanced graphics and sound capabilities.
The SNES was released in different regions between 1990 and 1993, and became one of the best-selling consoles of all time, with over 49 million units sold worldwide. Whether you enjoyed platformers like Super Mario World, RPGs like Chrono Trigger, or fighting games like Street Fighter II, the SNES had something for everyone.
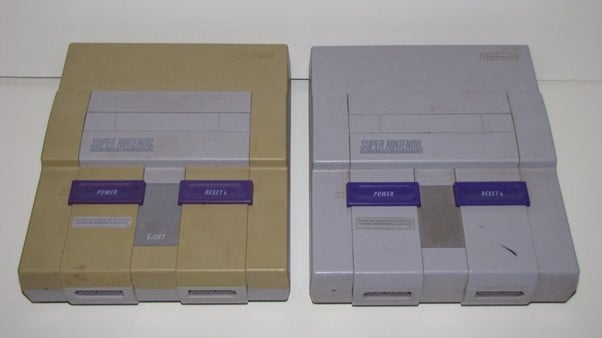
But time has not been kind to this beloved console. Over the years, many SNES units have suffered from a common problem: yellowing. This is when the plastic casing of the console turns from its original gray color to a dull yellow or brown hue, due to a chemical reaction caused by exposure to heat, light, and oxygen.
This makes the console look old and dirty, and can also make it more brittle and prone to cracking. Although yellowing does not affect the functionality of the Super Nintendo console, it does affect its appearance and value.
If you have a yellowed SNES that you want to restore to its original glory, you might think that your only options are to buy a new one or paint over the yellow parts. But there is another way: a way that is cheaper, easier, and more satisfying. A way that will make your SNES look as good as new, or even better. A way that will make you feel like a kid again!
As such, in this article, we will show you why the Super Nintendo turns yellow as well as how to fix it using a simple and safe method that anyone can do at home. All you need is some basic tools and materials, some patience and care, and a bit of creativity. In case you are short on time, then head to Retro Gaming Stores and buy yourself a new SNES Shell.
Why Did Super Nintendo Start Yellowing?
Over time, you may have noticed a gradual transformation in the color of your beloved Super Nintendo, as it transitions from its original pristine shades to a somewhat faded, yellowed hue. But what causes this curious phenomenon?
The primary culprit behind the yellowing of the SNES is the flame-retardant additive called bromine, specifically, the type known as brominated flame retardants (BFRs). These additives were commonly used in the production of electronic devices, including the SNES, to meet safety regulations. However, as the console ages, the bromine within the plastic casing undergoes a chemical reaction when exposed to oxygen and UV light.
The combination of oxygen and UV light triggers a process called bromine degradation, leading to the gradual discoloration of the plastic. This phenomenon is more noticeable in consoles that have been exposed to sunlight or harsh artificial lighting for extended periods. The result? That once sleek and gray console begins to take on a yellowish tint, subtly altering its appearance.
While the yellowing of the Super Nintendo may be disappointing to behold, fear not! It is merely a cosmetic issue and does not affect the console's functionality or performance. Restoring the SNES to its former glory involves tackling this discoloration head-on, breathing new life into the console, and allowing its original charm to shine through.
How to Get Rid of The Yellowing of SNES Console?
- Bleaching
One of the most popular and effective methods of restoring a yellowed Super Nintendo console is bleaching. This method involves using a hydrogen peroxide solution to remove the yellow color from the plastic. Hydrogen peroxide is a chemical that can break down the bromine molecules that cause the yellowing, and restore the original gray color of the plastic.
To bleach your SNES console, you will need the following tools and materials:
- A screwdriver that fits the screws on your SNES console
- A plastic container large enough to fit the plastic parts of your SNES console
- Hydrogen peroxide solution
- A UV light source (such as sunlight or a UV lamp)
- Some gloves and goggles for safety
- Some paper towels or cloths for cleaning
The steps for bleaching your SNES console are as follows:
- Disassemble your SNES console by removing the screws on the bottom and carefully lifting off the top and bottom shells. You can also remove the buttons, ports, and labels if you want, but be careful not to damage them.
- Fill your plastic container with enough hydrogen peroxide solution to cover the plastic parts of your Super Nintendo console. You can also add some water to dilute the solution if you want, but this will make the process slower.
- Place the plastic parts of your SNES console into the hydrogen peroxide solution, making sure they are fully submerged. You can use some weights or clips to keep them from floating.
- Place your plastic container in a location where it can receive UV light, such as outside in direct sunlight or under a UV lamp. UV light will activate the hydrogen peroxide and speed up the bleaching process.
- Leave your plastic container in the UV light for several hours, checking on it periodically to see the progress. Depending on the concentration of hydrogen peroxide and the amount of UV light, it may take anywhere from a few hours to a few days to fully bleach your SNES console.
- When you are satisfied with the color of your SNES console, remove it from the hydrogen peroxide solution and rinse it thoroughly with water. Dry it with some paper towels or cloths, making sure there is no moisture left inside.
- Reassemble your SNES console by putting back the buttons, ports, labels, and screws. You can also polish it with some rubbing alcohol or plastic polish to make it shine.
As seen above, bleaching is a simple and effective way to get rid of the yellowing of your Super Nintendo console, but it does have some drawbacks. It can be messy and potentially dangerous if you don’t handle the hydrogen peroxide carefully. It can also damage or weaken the plastic if you leave it in the solution for too long or use too high a concentration. It is not a permanent solution either, as the yellowing may return over time if you expose your SNES console to heat, light, and oxygen again.
- Polishing
Another method of restoring a yellowed Super Nintendo console is polishing. This method involves using a fine abrasive material, such as sandpaper or steel wool, to scrape off the yellow layer of plastic. This way, you can reveal the original gray color of the plastic underneath.
To polish your SNES console, you will need the following tools and materials:
- A screwdriver that fits the screws on your SNES console
- A fine-grit sandpaper or steel wool
- A gentle, lint-free cloth
- Some rubbing alcohol or plastic polish
The steps for polishing your Super Nintendo console are as follows:
- Disassemble your SNES console by removing the screws on the bottom and carefully lifting off the top and bottom shells. You can also remove the buttons, ports, and labels if you want, but be careful not to damage them.
- Use your sandpaper or steel wool to gently rub the yellow parts of your SNES console, applying even pressure and moving in circular motions. You should see some yellow dust coming off as you rub. Be careful not to rub too hard or too long, as you may remove too much plastic or damage the logos or labels.
- Wipe off the yellow dust with your cloth, and check the color of your Super Nintendo console. If it is still yellow, repeat step 2 until you are satisfied with the color. If it is gray, proceed to step 4.
- Use some rubbing alcohol or plastic polish to clean and shine your SNES console, applying it with your cloth and rubbing it gently. This will remove any remaining dust or dirt, and make your SNES console look smooth and glossy.
- Reassemble your Super Nintendo console by putting back the buttons, ports, labels, and screws. You can also polish them with some rubbing alcohol or plastic polish if you want.
Polishing is a simple and cheap way to get rid of the yellowing of your SNES console, but it does have some drawbacks. It can be tedious and time-consuming, as you have to rub each part individually and carefully. It can also alter the shape and thickness of the plastic, making it thinner or uneven. It can also scratch or damage the logos or labels on the plastic.
- Painting
Yet another method of restoring a yellowed Super Nintendo console is painting. This method involves using spray paint or a brush to cover the yellow parts with a new layer of gray paint. This way, you can hide the yellow color and make your Super Nintendo console look new again.
To paint your SNES console, you will need the following tools and materials:
- A screwdriver that fits the screws on your SNES console
- A spray paint or a brush that matches the original gray color of your SNES console
- Some masking tape or paper to protect the areas that you don’t want to paint, such as the buttons or ports
- A well-ventilated area to paint in, such as outside or in a garage
- Some gloves and goggles for safety
- Some paper towels or cloths for cleaning
The steps for painting your Super Nintendo console are as follows:
- Disassemble your SNES console by removing the screws on the bottom and carefully lifting off the top and bottom shells. You can also remove the buttons, ports, and labels if you want, but be careful not to damage them.
- Use some masking tape or paper to cover the areas that you don’t want to paint, such as the buttons or ports. Make sure they are well secured and leave no gaps for the paint to leak through.
- Shake your spray paint well before using it, or stir your brush paint well if you are using that. Hold the spray paint about 10 inches away from the plastic parts, or use your brush to apply thin and even coats of paint. Move in smooth and steady motions, and avoid spraying or brushing too much paint in one spot. You may need to apply several coats of paint, letting them dry between each coat until you achieve the desired color and coverage.
- Remove the masking tape or paper carefully, and check for any mistakes or imperfections. You can use some rubbing alcohol or nail polish remover to clean up any overspray or drips, but be careful not to damage the plastic or the logos or labels.
- Reassemble your Super Nintendo console by putting back the buttons, ports, labels, and screws. You can also polish it with some rubbing alcohol or plastic polish to make it shine.
Painting is an easy and cheap way to get rid of the yellowing of your SNES console, but it does have some drawbacks. It can make your Super Nintendo console look unnatural or fake, especially if you don’t match the original color or texture of the plastic. It can also chip or peel off over time, exposing the yellow parts again. It can also void your warranty or affect your resale value if you ever want to sell your SNES console.
- Retrobright Method
Continuing with the flow, yet another method of restoring a yellowed Super Nintendo console is the retrobright method. This method involves using a hydrogen peroxide solution to remove the yellow color from the plastic. Hydrogen peroxide is a chemical that can break down the bromine molecules that cause the yellowing, and restore the original gray color of the plastic1
To retrobright your Super Nintendo console, you will need the following tools and materials:
- A screwdriver that fits the screws on your SNES console
- A plastic container large enough to fit the plastic parts of your SNES console
- Hydrogen peroxide solution (you can use either 3% or 12% concentration, but 12% will work faster and better)
- Some baking soda or OxiClean powder to enhance the bleaching effect
- A UV light source (such as sunlight or a UV lamp)
- Some gloves and goggles for safety
- Some paper towels or cloths for cleaning
- Some plastic wrap to prevent the solution from drying out
The steps for retrobrighting your Super Nintendo console are as follows:
- Disassemble your SNES console by removing the screws on the bottom and carefully lifting off the top and bottom shells. You can also remove the buttons, ports, and labels if you want, but be careful not to damage them.
- Fill your plastic container with enough hydrogen peroxide solution to cover the plastic parts of your SNES console. You can also add some water to dilute the solution if you want, but this will make the process slower. Then add some baking soda or OxiClean powder to the solution and stir well. This will create a creamy paste that will stick to the plastic better and enhance the bleaching effect.
- Apply the paste to the yellow parts of your SNES console, using a brush or a sponge. Make sure to cover all the areas evenly and generously. Avoid getting any paste on the logos or labels, as it may damage them.
- Cover your Super Nintendo console with some plastic wrap, making sure there are no air bubbles or gaps. This will prevent the paste from drying out and losing its effectiveness.
- Place your SNES console in a location where it can receive UV light, such as outside in direct sunlight or under a UV lamp. UV light will activate the hydrogen peroxide and speed up the retrobrighting process.
- Leave your SNES console in the UV light for several hours, checking on it periodically to see the progress. Depending on the concentration of hydrogen peroxide and the amount of UV light, it may take anywhere from a few hours to a few days to fully retrobright your SNES console.
- When you are satisfied with the color of your Super Nintendo console, remove it from the paste and rinse it thoroughly with water. Dry it with some paper towels or cloths, making sure there is no moisture left inside.
- Reassemble your Super Nintendo console by putting back the buttons, ports, labels, and screws. You can also polish it with some rubbing alcohol or plastic polish to make it shine.
Just like the above methods, Retrobrighting is a simple and effective way to get rid of the yellowing of your SNES console, but it does have some drawbacks. It can be messy and potentially dangerous if you don’t handle the hydrogen peroxide carefully. It can also damage or weaken the plastic if you leave it in the paste for too long or use too high a concentration. It is not a permanent solution either, as the yellowing may return over time if you expose your Super Nintendo console to heat, light, and oxygen again.
- Hydrogen Peroxide Bath
Last but not least, yet another method of restoring a yellowed Super Nintendo console is the hydrogen peroxide bath method. This method involves using a hydrogen peroxide solution to remove the yellow color from the plastic. Hydrogen peroxide is a chemical that can break down the bromine molecules that cause the yellowing, and restore the original gray color of the plastic1
To hydrogen peroxide bath your Super Nintendo console, you will need the following tools and materials:
- A screwdriver that fits the screws on your SNES console
- A plastic container large enough to fit the plastic parts of your SNES console
- Hydrogen peroxide solution
- A UV light source (such as sunlight or a UV lamp)
- Some gloves and goggles for safety
- Some paper towels or cloths for cleaning
The steps for hydrogen peroxide bathing your Super Nintendo console are as follows:
- Disassemble your SNES console by removing the screws on the bottom and carefully lifting off the top and bottom shells. You can also remove the buttons, ports, and labels if you want, but be careful not to damage them.
- Fill your plastic container with enough hydrogen peroxide solution to cover the plastic parts of your SNES console. You can also add some water to dilute the solution if you want, but this will make the process slower.
- Place the plastic parts of your SNES console into the hydrogen peroxide solution, making sure they are fully submerged. You can use some weights or clips to keep them from floating.
- Place your plastic container in a location where it can receive UV light, such as outside in direct sunlight or under a UV lamp. UV light will activate the hydrogen peroxide and speed up the hydrogen peroxide bathing process.
- Leave your plastic container in the UV light for several hours, checking on it periodically to see the progress. Depending on the concentration of hydrogen peroxide and the amount of UV light, it may take anywhere from a few hours to a few days to fully hydrogen peroxide bath your SNES console.
- When you are satisfied with the color of your Super Nintendo console, remove it from the hydrogen peroxide solution and rinse it thoroughly with water. Dry it with some paper towels or cloths, making sure there is no moisture left inside.
- Reassemble your SNES console by putting back the buttons, ports, labels, and screws. You can also polish it with some rubbing alcohol or plastic polish to make it shine.
Hydrogen peroxide bathing is a simple and effective way to get rid of the yellowing of your SNES console, but it does have some drawbacks. It can be messy and potentially dangerous if you don’t handle the hydrogen peroxide carefully. It can also damage or weaken the plastic if you leave it in the solution for too long or use too high a concentration. It is not a permanent solution either, as the yellowing may return over time if you expose your SNES console to heat, light, and oxygen again.
The Ultimate Solution to Get Rid of the Yellowing of the SNES Console
If you are looking for a more permanent and less risky way to restore your Super Nintendo console, you may want to consider changing its housing shell instead. This method involves buying a new shell and transferring all the internal components from your old shell to your new shell. This way, you can avoid using any chemicals or abrasives that may harm your Super Nintendo console.
To change your Super Nintendo console’s housing shell, you will need the following tools and materials:
- A screwdriver that fits the screws on your SNES console
- A new housing shell that fits your SNES console model
- Some paper towels or cloths for cleaning
The steps for changing your Super Nintendo console’s housing shell are as follows:
- Disassemble your SNES console by removing the screws on the bottom and carefully lifting off the top and bottom shells. You can also remove the buttons, ports, and labels if you want, but be careful not to damage them.
- Clean the internal components of your SNES console with some paper towels or cloths, removing any dust or dirt that may have accumulated over time.
- Transfer the internal components from your old shell to your new shell, following the reverse order of disassembly. Make sure everything is aligned and secured properly, and that no wires are pinched or loose.
- Reassemble your Super Nintendo console by putting back the buttons, ports, labels, and screws. You can also polish it with some rubbing alcohol or plastic polish to make it shine.
As seen above, changing your SNES console’s housing shell is a simple and effective way to get rid of the yellowing of your SNES console, and it has many advantages over other methods. It is a permanent solution that will not fade or deteriorate over time. It is a safe solution that will not damage or weaken the plastic or the electronics. It is also a fun solution that will allow you to personalize your SNES console with different colors or designs.
Based on the color of your Super Nintendo, you can get the very same replica from Retro Gaming Stores:
Conclusion
The yellowing of the Super Nintendo console is a common problem that affects many retro gamers and collectors. It is caused by a chemical reaction between the bromine in the plastic and the oxygen and UV light in the environment.
Fortunately, there are several methods to restore the original color and appearance of the SNES console, such as bleaching, polishing, painting, or retrobrighting. However, the most effective solution is changing its housing shell. Each method has its pros and cons, and you should choose the one that suits your needs and preferences.
By following these methods, you can make your Super Nintendo console look as good as new again, and enjoy its classic games and memories for years to come!


.jpeg "The Original Pokémon Games Originally Released")


 (1).jpg "New PSP in 2023 Now Available at Retro Gaming Stores")
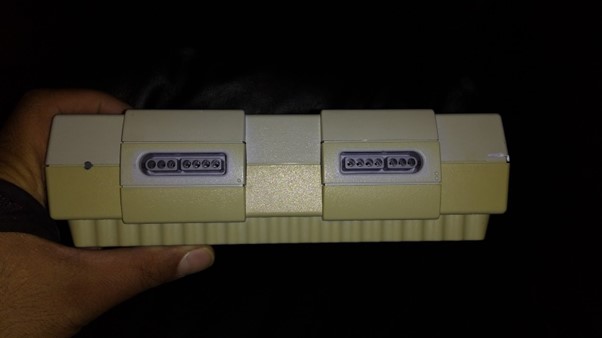
.jpg "Fixing a Yellowing SNES With a Replacement Shell")


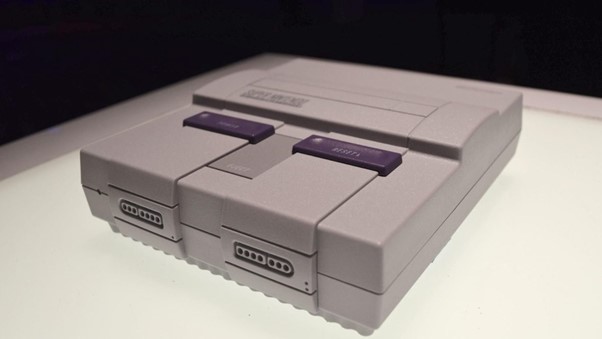
.jpg "The Original Super Nintendo - What is the Super Nintendo Console?")